 |
| For Family |
 |
| For Friends - with ice cream on the side |
 |
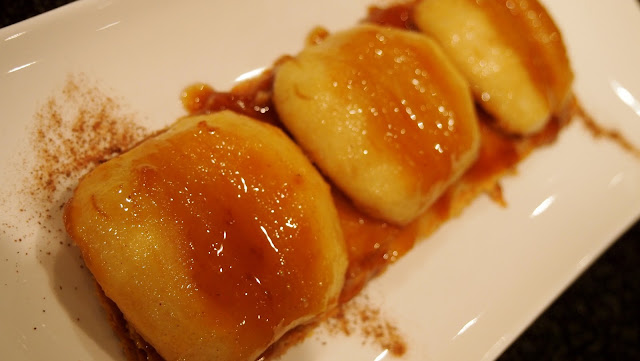
| Fabulous with Vanilla Marscapone Cream and Salted Butter Caramel |
Tarte Tatin is basically an upside down apple pie. What makes it so good is that the apples cook in a salted butter caramel. It is a fairly easy desert to make and here is a take on how to present it three ways. The only thing is that it really should be served with a good quality vanilla ice cream (see the post on vanilla ice cream that follows to make your own).
The story is that this pie was created accidently when the Tatin sisters, who ran an inn in France, started cooking apples in a sugar butter mixture and forgot about them. In order to try and save the apples, they covered them with a crust and put it in the oven to bake. Once cooked and cooled a bit, they turned it over on a plate and the result was a huge success.
You can make the pie with a traditional short crust pastry or a puff pastry base. I prefer it with the puff pastry and always use the store bought one. Puff pastry is actually not that hard to make but it is a time consuming process.
You will need: (for a tart that serves 4 to 5 people family style)
- 5 royal gala apples peeled, cored and cut in 1/2 (good type for this because they do not release a lot of water. Make sure to rub the apples with a little lemon juice to prevent them from browning once they are peeled).
- 60 g (1/3 cup) of brown sugar
- 60 g (1/4 cup) of salted butter
- 1 tsp of pure vanilla extract
- Puff pastry rolled out to about 3 mm and cut a little larger than the pan you will be using
_____________________
- Heat the oven to 200° F (400° C);
- Melt the butter, add the brown sugar and cook on a medium high heat in a deep non stick oven proof pan;
- Watch it carefully and when it begins to become a golden color, add the vanilla and apples cut side down (squeeze in as many as you can as they will shrink when cooked);
- Cook for about two minutes and turn the apples over (the rounded side will be the top of your pie when it is turned over);
- Add a couple of teaspoons of water to prevent the caramel from burning and continue to cook the apples for about 5 minutes shaking the pan a little to allow everything to cook evenly;
- Remove from heat and let the apples cool for 5 minutes;
- Lay the cold puff pastry over the apples and tuck the edges over to fit snugly in the pan;
- Bake for about 30 minutes or until the pastry is nice and golden.
- Remove from oven and let cool for about 5 minutes.
- Place a plate over the pan and gently turn over;
- If some of the apples stick, just remove them gently and place them back on the pastry.
- Serve warm with some good vanilla ice cream and sprinkle with some cinnamon if you like.
 |
| Put a towel on the handle to indicate it is hot |
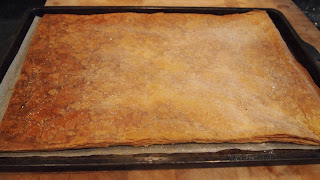
Alternately, in order to create a pie that is a little fancier visually, you can prepare the apples and the puff pastry separately. By baking the puff pastry between two baking sheets, it becomes compressed. You can still see the different layers but it has much more crunch. This makes a really good contrast to the soft apples.
For the puff pastry:
- Preheat the oven to 200° C (400° F);
- Roll out the puff pastry to the size of your baking sheet to about 3 mm thick;
- Place it on the parchment covered baking sheet and lay another piece of parchment paper over the pastry;
- Place another baking sheet the same size over the pastry and bake in the oven for about 20 minutes;
- The pastry will not be able to rise as much but will still have all the wonderful flaky layers to it;
- Once it has started to color, remove the top baking sheet and parchment paper and sprinkle with a some powdered sugar.
- Place it back in the oven and cook until the sugar melts and it becomes a wonderful golden color (the powdered sugar will make it shiny);
- Let it cool and you can now cut it to the size you want. Cutting it after it is cooked will give you a beautiful edge that allows you to see all the compressed layers of the pastry;
- Melt the butter and sugar on medium high heat and allow to color;
- Add vanilla and the cut apples (same as previously) and turn them over after about two minutes;
- Put the pan in the oven and finish cooking the apples in the oven for about 15 minutes (they should be soft when pierced with a knife but hold their shape);
- Remove the apples and lay them on the pastry as you like;
- Drizzle with any leftover caramel and serve.
Note: Serve with a little dish of vanilla ice cream on the side.
To take it up a notch with vanilla marscapone cream and salted butter caramel:
Prepare everything the same as for the friends style way but cut the pastry into individual circular shapes. Just before putting the apples on the baked crust, add some marscapone cream that has been lightly sweetened with powdered sugar and vanilla. Drizzle the caramel on the plate, set the tarte tatin and sprinkle with a little cinnamon!
For the Vanilla Marscapone Cream:
For the Vanilla Marscapone Cream:
- 1 container of marscapone cheese (250g)
- 2.5 tbsp of powdered sugar
- 1 tbsp of pure vanilla extract
________________
For the Salted Butter Caramel:
- 150g of sugar
- 2 tbsp of water
- 150ml of heavy cream
- 30g of salted butter
- pinch of sea salt (fleur de sel)
_____________
- Make a caramel by putting the sugar in a pan with the water and cook on medium high heat until golden in color (the sugar usually colors unevenly so just swirl the pan around a little, then brush down the sides to remove sugar deposits with a pastry brush dipped in water);
- Note: Don't stir the sugar as this will allow air into the mixture and it may crystallize. This would give you lumps in the final caramel.
- Heat the cream on medium heat while the sugar is coloring;
- Very slowly pour the cream into the sugar and stir (be very careful as the caramel will bubble up);
- Continue cooking until all the sugar is dissolved and it has boiled for a few minutes. Remove from heat;
- Add the butter and pinch of salt and let cool;
- The caramel will thicken as it cools and can be reheated in the microwave when ready to serve.
- Place in a squeeze bottle that you can cover with plastic wrap and keep in the fridge for a least one week.
Note: This caramel sauce can be served with a number of deserts and as a topping for ice cream.


Comments
Post a Comment
Share you comments or ideas / Request information